Starting out in the guild
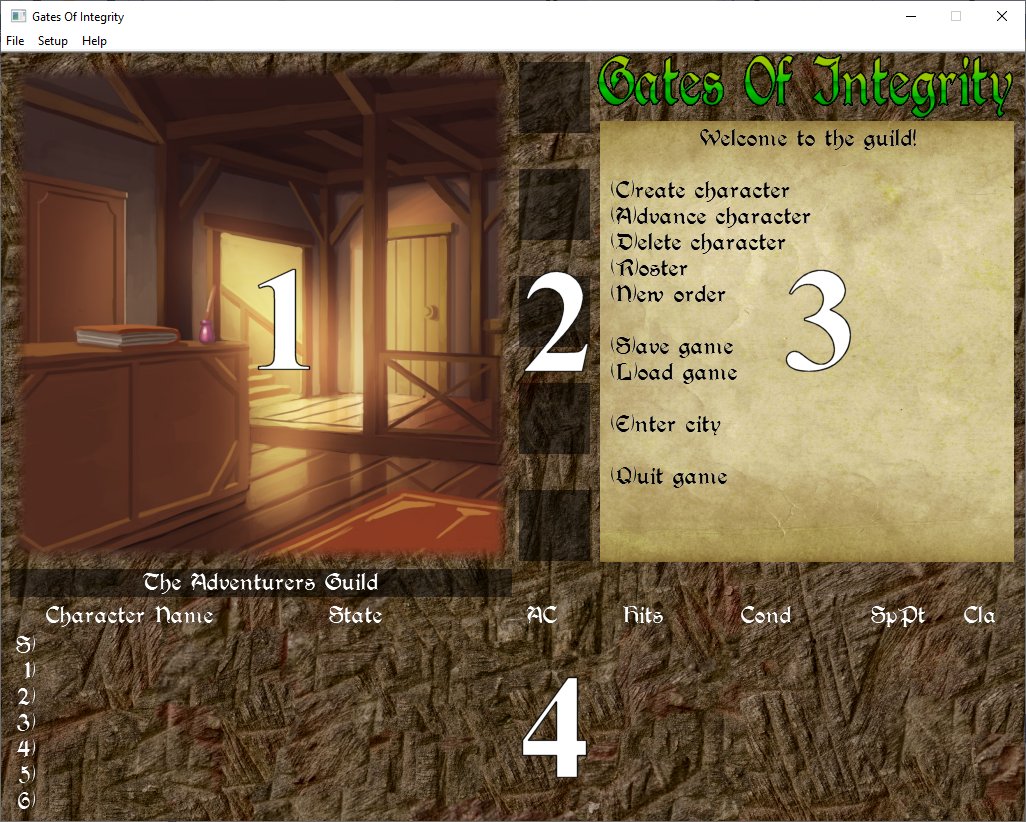
You start in the guild of Anroburg where the game greets you with
this screen:
The game window comprises four primary areas:
- Graphics area - Displays the current location, a group
of monsters while in combat or the city or dungeon you are in.
- Gumps / Spell icons - If you cast beneficial spells with
long-lasting effects, a small icon will show up here.
- Text area - Displays all the interactions like choosing options, fighting
monsters and talking to NPCs.
- Character info - Short information about the characters
you control plus the optional Special NPC character that might
travel with you. See the appendix for State,
AC, Hits/Cond, SpPt and Cla
In the guild you have the following options:
- C - Create character: See
next chapter
- A - Advance character: If your
characters gained enough experience points, they may level up
and gain some Hit Points, Spell Points and Skill Points.
- D - Delete character:
Deletes a party member permanently. This cannot be undone - if
you want to save some characters outside the party, you can use
the Roster.
- R - Roster: Party members can be
stored here for later use. The party, roster and game progress
are stored together if you save the game.
- N - New order: Rearrange party members. Keep in mind
that melee monsters can only attack
the first three party members so
you should put your
fighters in the first three slots.
- S - Save game: Saves your progress in the game, your
party and the roster to disk. You can only save in the guild!
- L - Load game: Restores a saved game.
- E - Enter city: If you put together your party you
may step out of the guild and find out how you could save
Eodora.
- Q - Quit game: Leave the game and return to your
earthly tasks.
Press ‘C’ in the guild to generate a new character. If there are 6
characters in your party, you have to delete
one of them or move a character into the Roster. The
character creation involves the following steps:
- Male/Female: Press 1 for a male character and 2 for a
female character. There are no differences in gameplay besides
the character picture for male and female characters.
- Race:
- (1) Human: Humans are good (but not excellent) in
all areas.
- (2) Elf: Having developed high intelligence and
dexterity, elves are a good fit for magic classes.
- (3) Dwarf: These strong and enduring race is suited
for fighter classes.
- (4) Hobbit: The highly dextrous hobbits will make
good Monks and Rogues.
- (5) Centaur: This remarkable creature starts with
the highest endurance of all races and will make an
excellent fighter.
- Now the attributes are generated
automatically, based on the race you have chosen. You may press
(R) to generate them again as often as you like. If you are
satisfied with the attributes, you may continue with the next
step.
- Class: Depending on the attributes generated in the last step,
you may choose from a subset of the following classes (Note:
Only Druids, Conjurers, Wizards and Archmages can use magic spells)
- (1) Warrior: High in strength and endurance, the
warrior will hit hard in combat.
- (2) Paladin: The strong and focused paladin will be
an excellent addition to a warrior.
- (3) Monk: Focused on its enemies, but also dextrous
in parrying, the monk will be an excellent fighter in later
stages of the game. The monk can hide in shadows.
- (4) Rogue: The extremely dextrous rogue can hide in
combat, making him almost invisible for enemies.
- (5) Mentalist: As a highly skilled manipulator, the
mentalist has the ability to pull a
group of enemies towards the party.
- (6) Druid: In unity with nature, druids can
manipulate light, air, but also aid the party in combat as
healers.
- (7) Conjurer: Conjurers are more focused on
offensive combat spells.
- Wizard / Archmage: These classes will become
available as you advance your magical users. You will be
able to make all of your magic users learn all spells of the
four magical classes.
- Name: In this last step you give your new character a
name. To discard character creation, press ESC here.
Outside the guild, you might control your
party with the following keys:
- Cursor key up, I or K: move party forward.
- Cursor key down: move party backward.
- Cursor key left or J: turn party left
- Cursor key right or L: turn party right
The party will turn around 90 degrees and move one map tile
forward or backward.
- C - Cast a spell: After pressing C, the game asks who
wants to cast a spell. Press the number of the magic user and
you will be asked for the four letter code of the spell. Look
them up under spells. Note that your
new characters will start at level 1 of their mage class, so
they can only cast level 1 spells. Later on, you will advance to
higher spell levels.
- N - New order: This will ask you to enter the desired
order of your party members by pressing the numbers 1..6. Move
your fighters in the three front ranks while putting your magic
users into the last three ranks. This will ensure the fighters
can engage in melee combat and your mages can’t be hit by foes
in melee.
- U - Use item: After choosing the character who will use
an item, you will see the inventory
of the character. Only equipped items are
usable. This is intended for items like torches and lamps.
Passive items like rings and armor parts or weapons cannot be
"used" this way. The game automatically uses them in combat.
- M - Map: Toggle automap on/off
- Numbers 1..6: The
characters you control are numbered 1 to 6 (the number left of
their name). If you press the number while walking around in the
city or a dungeon (here, 1 for Ironmark) you will see the
character overview:
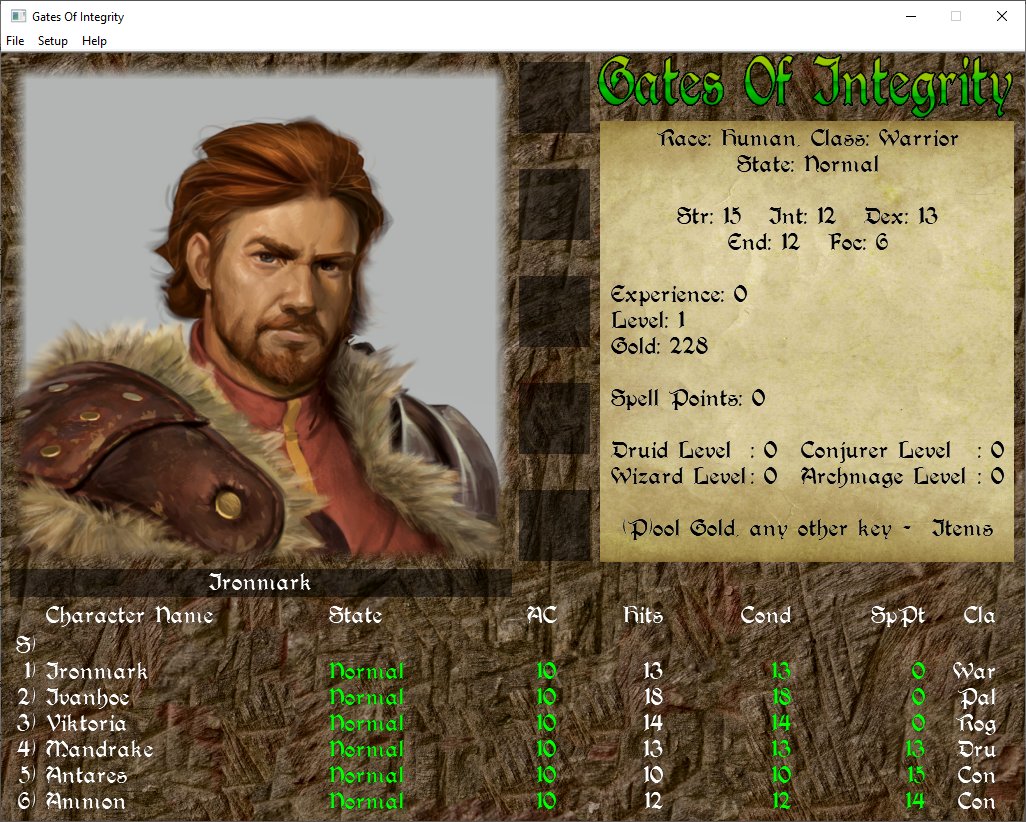
First there are race and class,
followed by state and attributes.
Experience: The experience points the character has earned in combat
or by completing quests. If the character gained enough experience
points, he or she might advance a level in
the guild.
Level: Every time you advance your
characters, their level increases by one.
Gold: Your hard earned cash.
Spell Points: Only for magical classes: This is the maximum number
of spell points your character can have. Spell Points will go up
every level the character advances.
Finally, there is an overview showing the maximum level of spells
for each magic class the character can cast. If a character has a
level of 7 at all four classes, this will be a true archmage,
knowing every spell in the game.
Press P to give all the gold in the party to the selected character.
You may select any other character by pressing 1..6. Pressing Space
brings up the inventory for this character:
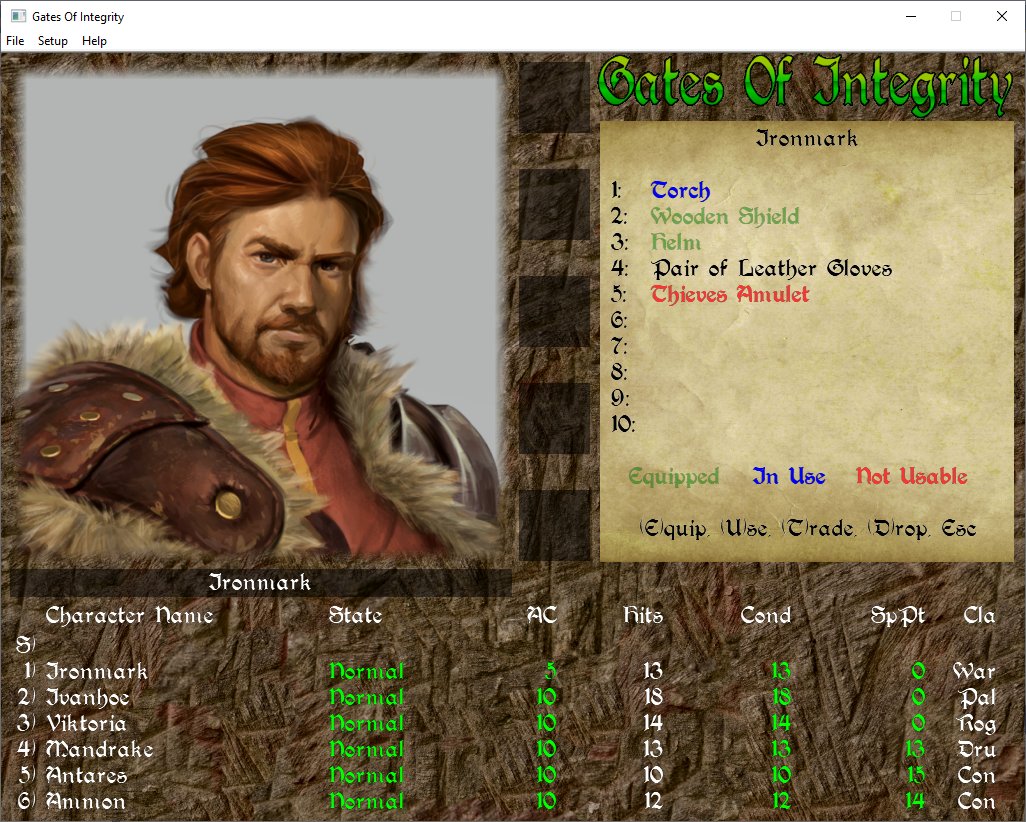
Every character may hold up to 10 items. Notice the colors:
- Ironmark has equipped
and used the torch, so it is now burning.
Items in use are displayed in blue.
- The wooden shield and helm are equipped, meaning they will be used in combat
and actively decreasing Ironmarks AC.
Equipped items show up in green.
- Ironmarks pair of leather gloves is not equipped.
He is just holding them, so they are displayed in black.
- Finally, Ironmark holds a thieves amulet
which he cannot equip or use because he is a warrior, not a thief.
Unusable items are shown in red.
In the inventory screen of the character, you have these options:
(Note: When asked for an item number use keys 1..9 and 0 for item
number 10!)
- E - Equip: The game asks for an item to equip. Enter
the number of the item. Only equipped armor and weapons will be
used in combat!
- U - Use: This will ignite items like torches and lamps.
Note they won't last forever - clear them when leaving dark
areas by using them again.
- T - Trade: You might want to give unusable items to a
character that can use the item. Enter the item number, then the
character number you want to give the item to.
- D - Drop: The specified item will be dropped and lost
forever! Use this with care!
- Numbers 1..6: Changes the character shown.
- ESC or Space: Leave the inventory screen and go back to
the game.
All items are classified by type. Individual characters can hold
multiple items of a type but they may equip only one item of each
type.
Item types include Armor, Weapons, Shields, Helmets, Gloves, Rings,
Boots, Amulets, Wands, Quest Items and Light Sources.
Finding your way
Every time you leave the guild it will be early morning. This
will help your party when you just created it as in the
nighttime you will encounter more evil creatures in the city of
Anroburg.
Your first step should be to map the city. Take note where the
buildings are. You will find some special places:
- Shrine Of Bran: In the heart
of Anroburg opposite the guild, this shrine will be an
important location for your party. You may:
- P - Pool your gold: Select the party member to
receive all the gold the party holds.
- H - Heal a character: Heals a party member of
all diseases. Be prepared to pay a high price for curing
diseases.
- C - Cure the whole party: If you can pay the
price, the monks will cure all wounds and diseases of
the party.
- R - Resurrect a fallen one: Brings one
character back from the realm of the dead.
- B - Buy spell points: Your magic users might
fill up their spell points here. Note that you can
recharge spell points in daylight for free.
- L - Load up magical wand: In later dungeons you
might find some magical wands capable of casting combat
spells. If the wands are out of uses, you can recharge
them here.
- M - Mage class change: This option lets you
change the class of your magic users (Druid, Conjurer,
Wizard, Archmage). The character must have reached level
3 in their current class. All spells of the current
class learnt so far will still be available, but be
aware you cannot change back to an old class so you
cannot learn new spell levels of old classes.
- T - Talk about the gates: Ask the priests what
they know about the gates. Depending on your progress,
they may have found something new!
- E - Exit the shrine: Leave the shrine and go
back to Anroburg.
- Tavern: In the southern part
of Anroburg you will find the tavern, source of rumors and
vital for the adventurer. Your options are:
- P - Pool your gold: Select the party member to
receive all the gold of the party.
- O - Order a drink: For 150, gold pieces the
barkeep will give you your favorite poison. Don't lose
yourself there.
- T - Tip the barkeep: You may loosen the tongue
of the barkeep with some gold...
- A - Ask for rumors: Some guests will babble
secrets.
- E - Exit the tavern: If you heard and drunk
enough, go back into the city.
- Kendricks Equipment Shop:
Kendrick built his armor shop in the northern plains of
Anroburg.
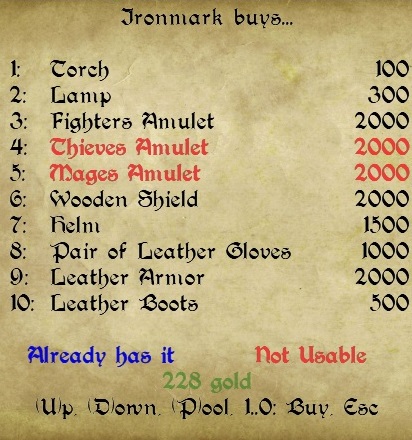
- B - Buy an item: First, select the character
who wants to buy an item.You may scroll up and down with
U and D, pool gold with P and buy an item with the
numbers 1..0. Press Esc to go back to the main menu of
the shop.
- S - Sell an item: This will present you the
same menu as when you are buying items. Kendrick will
give you half the value of the item back. Look out, you
can sell vital quest items to Kendrick!
- E - Exit the store: Go back to Anroburg.
- Empty building: When you enter
these buildings, you may be confronted with some monsters. This
will give you good opportunities to collect some gold and
experience points. Press E to leave the building. You may
encounter another group of monsters of you go right back into
the building.
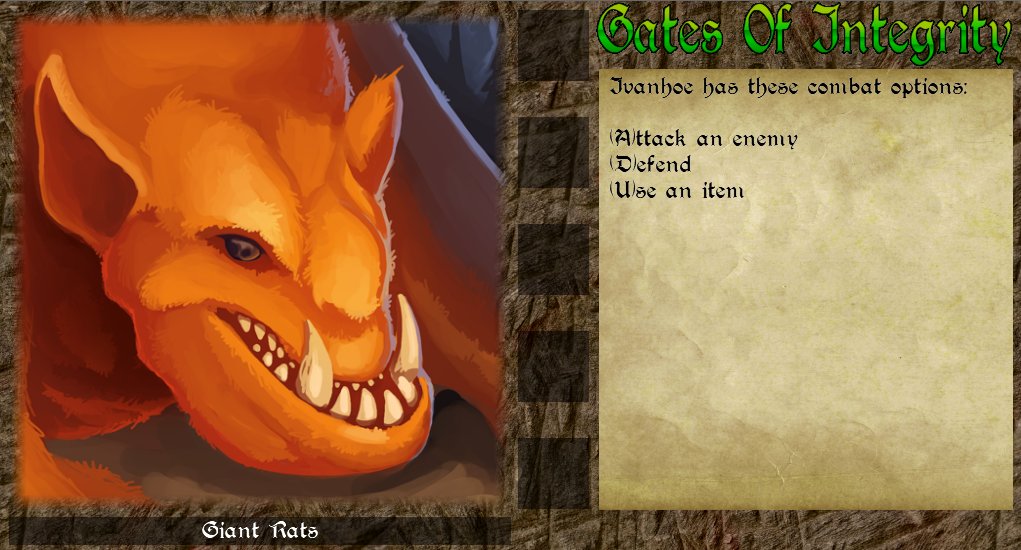
While walking around in the city of Anroburg or in dungeons you will
meet some unpleasant residents of Eodora: The products of evil
magery, left to the harsh nature of these lands.
The battles are turn-based. In each round you select an option of
every character that isn't dead, paralyzed or stones:
- A - Attack an enemy: Only the first three party members
might use this option. If you face more than one group of
enemies, you can choose between the first two groups. The
character will try to hit a monster of the selected group with
his/her weapon or with bare hands if no weapon is equipped.
- D - Defend: Increases the chance to successfully parry
attacks.
- C - Cast a spell: This option is available for any
spell caster. You need to enter the 4 letter code of the spell.
- L - Last combat spell: Use the last combat spell for
this character again.
- U - Use an item: Magical wands are usable by any class,
even fighters. Depending on the spell the wand casts, you are
asked at what group it should be aimed.
- P - Pull a group towards the party:
Mentalists are able to pull a group closer to the party, so your
fighters may attack it.
- H - Hide in shadows: A special ability gained in many
years of training, Monks and Rogues can hide in a combat,
minimizing the chance of being hit.
- File -> Exit: Quits the game. You have to save your
game first if you want!
- Setup -> Spellcasting: Toggles between classic
type-in of the four-letter codes and two different spell
selection screens for spellcasting.
- Setup -> Message Speed: Text scrolling speed while
in combat. Use "No wait" if you are not interested in the
details.
- Setup -> Sound: Change music volume.
- Setup -> Inscriptions: If you easily understand
Middle English you can choose to display all inscriptions in
dungeons in Middle English.
- Setup -> Skip Intro: When selected, skips intro
every time while loading the game.
- Setup -> Fullscreen: The game runs in fullscreen
when this option is active. You need to restart the game in
order for it to work.
- Help -> Help: This help
- Help -> About: Short info and link to the Homepage.
- Help -> Donate: If you want to donate, you can do
so via PayPal.
Appendix
Attributes:
- Strength (Str): In armed and unarmed combat, high
strength gives a damage bonus.
- Intelligence (Int): Intelligence improves magic
resistance against combat spells.
- Dexterity (Dex): Like intelligence, important for magic
resistance, but also for parrying in melee combat.
- Endurance (End): High endurance will make fighters hit
harder in combat.
- Battle Focus (Foc): With a higher focus, the chance for
hitting a monster in combat is increased.
State:
- Normal: The character is healthy and ready for combat.
- Poisoned: You may experience three levels of poison:
Slow, Fast and Deadly. The higher the level of the poison, the
more Hit Points the characters
will lose in a given time.
- Paralyzed: Beaten by a monster or knocked out by a
trap, the character is unconscious. You will need some magic or
help from the shrine.
- Stoned: The unlucky adventurer is not only unconscious,
but converted to stone completely. Only a strong magic spell or
the monks in the shrine can save his or
her life!
- Dead: Not all is lost if a character dies. A powerful
Archmage in your party can resurrect the character. And as
always, the shrine is waiting to make some money…
AC: Armor class. By finding and equipping
armor parts or using high level spells, you can decrease the AC of
your characters. A lower AC makes it more difficult to hit the
character. But beware: High level monsters in later dungeons can
easily smash through low ACs, so always be sure to look for better
armor. New characters start with an AC of 10.
Hits/Cond: "Hits" reflects the
maximum condition the character can have. "Cond" shows the number
of damage points the character can take before he or she dies.
There are some ways to regenerate lost condition. First, you can
visit the shrine and heal your character
for some gold coins. Then, if your mages are powerful enough, you
might heal party members with magic. And maybe you will find some
others ways in your travels...
SpPt: Spell Points. All spells your
characters are casting, will cost some amount of Spell Points. If
the number of Spell Points needed is greater than the required
points for the spell you want to cast, you cannot cast the spell.
But again, you might visit the shrine to
fill them up for some hard-earned gold. If you are patient enough,
you might also wander around in the city at daytime. This will
recharge Spell Points very slowly. The maximum number of Spell
Points a character might get can be seen in the character overview.
Cla: This shows the class
you have chosen for this character.